
There’s a difference between storing surfboards and having a clean surfboard storage setup — and your partner, roommates, or own sense of order knows the difference immediately. Boards leaning against walls, wetsuits draped over chairs, wax melting on counters, and leashes tangled in corners isn’t storage — it’s chaos that happens to contain surf gear. A proper surfboard storage system organizes every piece of surf equipment into a designated spot, keeps the area visually clean, and makes grabbing gear for a session fast rather than frustrating. Good surf gear organization isn’t about minimalism for its own sake — it’s about a system where everything has a home, gear stays protected, and the space looks intentional rather than neglected.
Clean storage matters practically, not just aesthetically. Disorganized gear gets damaged (boards ding each other, wetsuits mildew when piled), wastes time (searching for fin keys, untangling leashes), and creates household friction (non-surfers living with gear chaos). A clean system solves all three: boards stay protected in designated spots, accessories are findable in seconds, and the space looks like an intentional surf zone rather than a disaster. This guide covers how to create a complete, clean surfboard storage system that organizes boards, wetsuits, and every accessory into a functional, attractive setup.
What Does a “Clean” Surfboard Storage Setup Include?
A clean surfboard storage setup includes dedicated board storage (racks/stands), wetsuit drying/hanging, accessory organization (fins, wax, leashes, keys), a changing area or mat, and designated zones for wet vs. dry gear — everything visible, accessible, and intentional.
The five zones of a clean surf storage system:
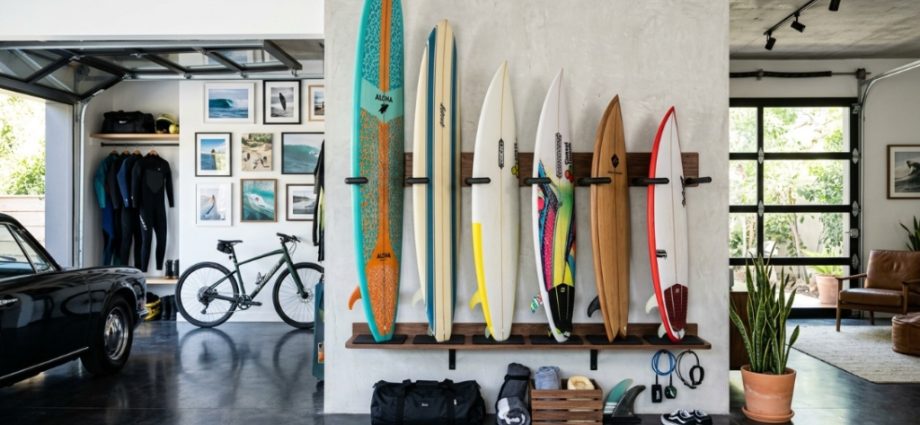
- Zone 1 — Board storage: Racks, stands, or wall mounts holding boards securely. The visual centerpiece of the setup.
- Zone 2 — Wetsuit station: Wide-shoulder hangers or drying racks. Ventilated. Separate from boards to prevent moisture transfer.
- Zone 3 — Accessories: Bins, hooks, or organizers for fins, wax, leashes, fin keys, ear plugs, sunscreen. Everything findable without digging.
- Zone 4 — Wet gear transition: A mat or tray for incoming wet items. Contains water and sand before gear moves to its proper spot.
- Zone 5 — Ready-to-go zone: A spot where your session kit stages before you leave — board, suit, towel, keys, wax — grab and go.
How Do You Organize Boards for a Clean Look?
Organize boards cleanly by using matching or coordinated racks, maintaining consistent spacing between boards, aligning boards parallel (not random angles), and keeping rack hardware minimal and matching — visual consistency creates the “clean” impression.
Board organization principles:
- Consistent rack style: Use the same type of rack for all boards (all wall-mounted, all same stand model). Mixing styles looks chaotic.
- Even spacing: Equal distance between boards on a rack creates visual rhythm. Uneven spacing looks random and messy.
- Parallel alignment: All boards oriented the same direction (all fins up or all fins down). Mixed orientations look disorganized.
- Clean hardware: Hide mounting hardware or use minimal, matching hardware. Visible mismatched brackets and random screws look DIY in a bad way.
- Size order: Arrange boards by size (shortest to longest or vice versa) for visual progression rather than random placement.
Taking care of your gear requires dedication, consistency, and a safe environment—qualities that mirror how we approach personal commitments. Just as structuring a home to support others requires understanding core duties, like reviewing the six responsibilities of a foster carer, properly protecting your boards demands the right framework to keep everything safe and functional over time.
How Do You Organize Wetsuits and Accessories Without Clutter?
Organize wetsuits on wide-shoulder hangers (never folded), accessories in labeled bins or on pegboard hooks, and leashes on dedicated hooks — the key is every item having a visible, designated spot rather than being piled or scattered.
Wetsuit organization:
- Wide-shoulder hangers: Proper wetsuit hangers prevent shoulder crease damage. Mount a rod or use a freestanding rack.
- Ventilation: Wetsuits need airflow to dry and prevent mildew. Don’t cram them in closets — hang in ventilated areas.
- Separate from boards: Wet or damp suits near boards risk moisture damage. Keep zones distinct.
- Boots/gloves/hood: Hung on hooks or placed on a boot dryer. Never balled up in a pile.
Accessory organization:
| Accessory | Organization Method | Why This Works |
|---|---|---|
| Fins + fin keys | Small labeled bin or pegboard hooks | Findable instantly, prevents loss |
| Wax + comb | Small container (cool storage) | Prevents melting, keeps together |
| Leashes | Individual hooks (one per leash) | Prevents tangling, visual clarity |
| Sunscreen/zinc | Small shelf or bin | Grouped with pre-surf items |
| Repair supplies | Dedicated toolbox or bin | Complete kit together for quick ding fixes |
| Towels/poncho | Hooks or shelf (dry) | Ready to grab for sessions |
What’s the Best Layout for a Surf Storage Zone?
The best layout follows a workflow: boards stored on one wall/section, wetsuits drying nearby but separate, accessories organized below or beside boards, and a transition mat near the entrance where wet gear arrives — creating a logical flow from arrival to departure.
Recommended layout flow:
- Near entrance/door: Transition mat + wet gear hooks (for incoming damp items). First stop when you return from a session.
- Primary wall: Board rack — the visual anchor and largest element. Clean, organized, and impressive.
- Adjacent to boards: Wetsuit hanging (with ventilation space). Close but not touching boards.
- Below or beside boards: Accessory storage (bins, hooks, pegboard). Accessible while loading or preparing boards.
- Ready-zone near door: Where you stage your session kit before leaving. Board comes off rack, accessories grabbed, out the door.
This layout creates a natural workflow that keeps the space clean through use — items return to designated spots because the spots are logically placed in the flow of arriving and departing for surf sessions.
How Do You Keep a Surf Storage Area Clean Over Time?
Keep it clean by following the “everything has a home” rule — every item returns to its designated spot immediately after use, a quick weekly maintenance routine prevents buildup, and the system itself makes organization easier than disorganization.
Maintenance habits:
- “One item, one home” rule: Every piece of gear has exactly one designated spot. When you use it, it returns there immediately. Not “later” — now.
- Post-session routine (2 minutes): Rinse gear, hang wetsuit, stage board in rack, toss accessories in bins. Done before you shower.
- Weekly reset (5 minutes): Quick scan for items out of place, empty sand from transition mat, check wetsuit drying, quick wipe of surfaces.
- Monthly deep clean (15 minutes): Clean rack surfaces, check wetsuit for mildew, reorganize accessories, dispose of used wax blocks.
- Design for easy maintenance: If returning an item to its spot takes more than 3 seconds, you won’t do it consistently. Make the system so easy that disorganization takes more effort than organization.
What Storage Products Create the Cleanest Look?
Matching rack sets (same material/finish), uniform bins or baskets, consistent hook styles, and a cohesive color palette across storage elements create the cleanest visual impression — coordination trumps individual product quality for overall aesthetics.
Products that create visual cohesion:
- Matching rack sets: Same brand/style of rack for all boards. Wood all the same finish. Metal all the same color.
- Uniform storage bins: All bins the same size, material, and color. Labeled if not transparent. Creates visual rhythm.
- Consistent hooks: All the same style and color. Not random assorted hooks from different purchases.
- Pegboard system: A pegboard organizer with consistent hardware creates an organized, adjustable, visually clean accessory wall.
- Color coordination: Choose a neutral palette for storage elements (black, white, natural wood) and let the colorful boards be the visual interest.
The design principle: storage elements should recede visually while boards and gear are the focus. Neutral, matching storage hardware creates a clean backdrop. Random, colorful, mismatched hardware creates visual noise that makes any space look cluttered.
How Much Does a Clean Surf Storage Setup Cost?
A complete clean surf storage setup costs $100–$400 depending on board count and aesthetic standards. Basic functional organization runs $50–$150; attractive furniture-quality systems run $200–$500. The investment protects gear and improves daily life.
Budget breakdown:
- Board rack(s) ($30–$200): The main investment. Ranges from DIY to furniture-grade depending on visibility and standards.
- Wetsuit hanging solution ($15–$50): Proper hangers + rod or rack. Simple investment that prevents suit damage.
- Accessory organization ($20–$60): Bins, hooks, pegboard, labels. Small individual costs that add up to complete organization.
- Transition mat ($15–$30): Contains incoming water and sand. Protects floors and creates the arrival zone.
- Miscellaneous ($10–$30): Labels, cleaning supplies, boot dryer, small containers.
- Total: $90–$370
For most surfers, $100–$200 creates a genuinely clean, organized, functional setup. Spend more for furniture-quality aesthetics in visible living spaces. The investment pays off through gear protection (prevents expensive dings and mildew), time savings (find everything instantly), and household harmony (the space looks intentional).
Conclusion
Creating a clean surfboard storage setup transforms surf gear from household chaos into an organized, attractive system that protects equipment, saves time, and looks intentional. The key is designating specific zones (boards, wetsuits, accessories, wet transition, ready-to-go), ensuring every item has a permanent home, and maintaining the system through simple post-session habits rather than occasional big cleanups.
Start with board storage as the visual anchor, add wetsuit hanging with ventilation, organize accessories into visible labeled bins or hooks, and create a workflow from door to rack that makes maintaining organization easier than creating mess. Match storage hardware for visual cohesion, keep the palette neutral so gear provides the color, and budget $100–$300 for a complete setup that serves you daily. A clean surf storage system isn’t about being neat for neatness’ sake — it’s about a functional space that gets you to the waves faster, keeps your gear healthy longer, and makes your home better rather than worse for having a surfer living in it.
What’s your biggest surf storage headache right now? Share in the comments — I’ll suggest the specific organizational fix for your particular mess.
Frequently Asked Questions
How do I organize a surfboard storage area at home?
Create five zones: board storage (racks/stands), wetsuit drying (wide hangers with ventilation), accessory organization (bins/hooks for fins, wax, leashes), wet gear transition (mat near entrance), and a ready-to-go staging spot. Every item gets a designated home it returns to after each session.
How much does a clean surf storage setup cost?
A complete organized setup costs $100–$400 depending on board count and aesthetic standards. Basic functional organization with board rack, wetsuit hangers, and accessory bins runs $100–$200. Furniture-quality display systems for visible living spaces run $200–$500.
How do I keep my surf gear organized long-term?
Follow the “every item has one home” rule and establish a 2-minute post-session routine (rinse, hang suit, rack board, bin accessories). Design the system so organization is easier than disorganization — if returning an item takes more than 3 seconds, you won’t maintain it. Simplicity sustains.
What’s the best way to store wetsuits at home?
Hang on wide-shoulder hangers (never fold — it creases neoprene) in a ventilated area separate from boards. Use proper wetsuit hangers that distribute weight without stretching shoulders. Allow airflow for drying and mildew prevention. Never store damp in enclosed spaces.
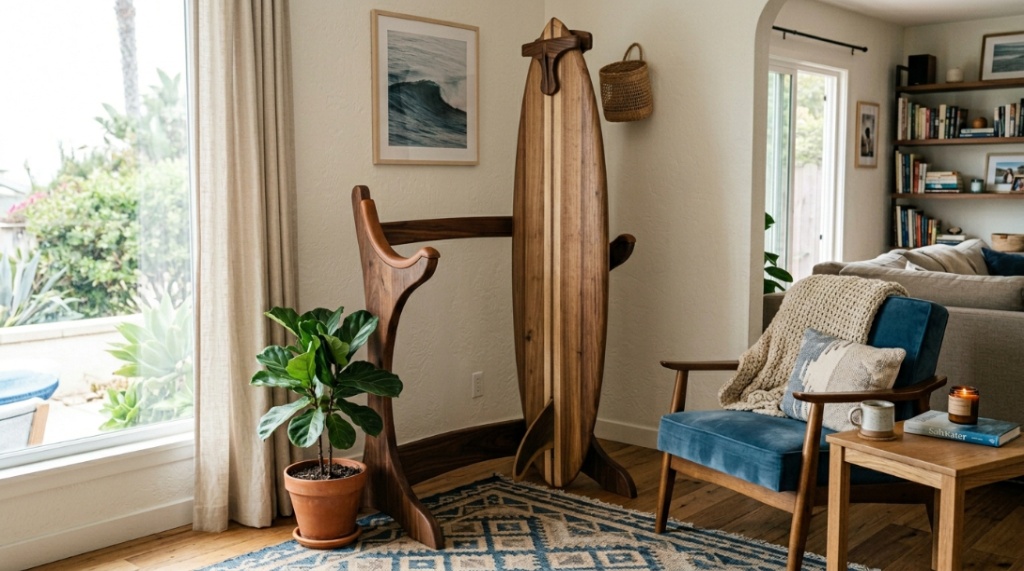
How do I make surf storage look good in a living space?
Use matching, furniture-quality storage elements (same finish, same style). Let neutral storage hardware (black, white, wood) recede while colorful boards provide visual interest. Display boards as wall art. Keep accessories hidden in uniform bins. Coordinate rather than clash with room décor.
What accessories do I need for an organized surf storage area?
Essential: board rack/stand, wetsuit hangers, small bins for fins and wax, hooks for leashes, a transition mat for wet gear, and a cool container for wax (melts in heat). Optional: pegboard system, boot dryer, labeled containers, repair supply bin. Total accessory investment: $30–$80.
Comments are closed, but trackbacks and pingbacks are open.